


Who This Post Is For :
This post is for growing teams that have already outgrown the casual way most companies handle logins in the early days.
I am talking about teams that are dealing with some version of this mess:
- Founders still sharing credentials in chat.
- Contractors needing temporary access.
- Sales, marketing, and ops all using different SaaS tools.
- IT or operations teams getting dragged into constant password-reset cleanup.
That is the niche where 1Password looks strongest in 2026.
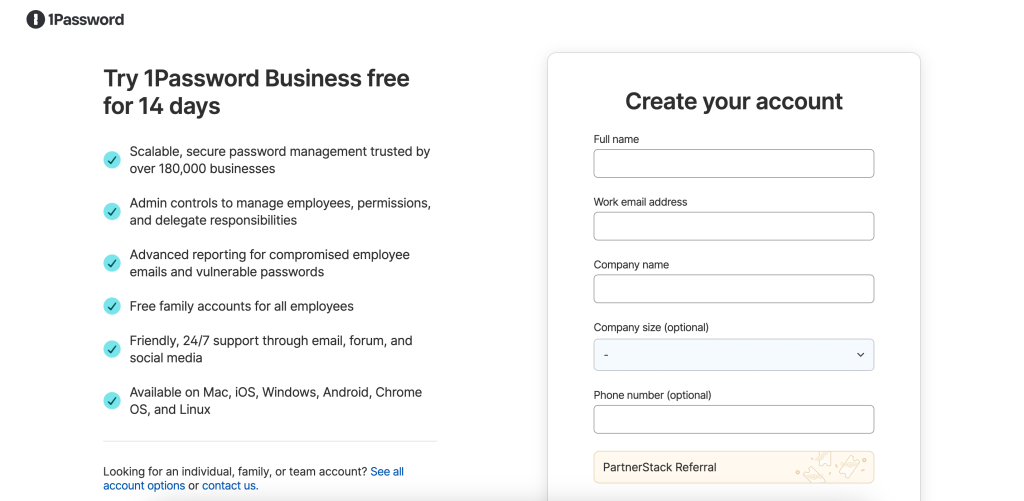
The official 1Password business security pages are not vague about who the product is for. They frame 1Password as a password manager for teams and businesses, and they also emphasize a business password vault, stronger security, helpdesk reduction, autofill, policy controls, reporting, and governance for passwords, secrets, apps, and access.
That combination tells you a lot.
1Password is not only for personal password storage. It is especially well suited to teams that need shared access discipline without turning day-to-day work into an IT headache.
If you want to inspect that official business positioning while you read, start with 1Password here.
Why 1Password Fits This Niche :
The reason 1Password fits growing teams so well is not hard to spot from the official product language.
The business page highlights several practical themes:
- Simplifying team security.
- Securing company data through a business vault.
- Cutting helpdesk tickets.
- Minimizing password resets.
- Autofilling account credentials.
- Adding visibility, control, and governance.
That is exactly the language a scaling team should care about.
Early-stage companies usually do not fail on access management because they do not know security matters. They fail because the everyday workflow is messy. One person owns too many shared credentials, another person keeps reusing old passwords, and nobody wants to stop work just to document access properly.
1Password looks strongest when the company has reached the point where that mess is no longer small enough to ignore.
The official page also says business and enterprise customers can create policies, custom rules, monitor sign-in attempts, and generate reports. That matters because the real shift for a growing team is not just secure storage. It is moving from informal access habits to a system the company can actually govern.
The Specific Niche: Growing Cross-Functional Teams
If I had to narrow the niche even further, I would say 1Password is especially well suited to growing cross-functional teams with shared SaaS access.
That includes:
- SaaS startups with 10 to 200 employees.
- Remote-first teams using many cloud tools.
- Agencies managing internal and client-facing accounts.
- Operations-heavy businesses with a lot of vendor logins.
Why this niche?
Because the official 1Password business messaging is clearly about balancing security with usability. It is not selling endless complexity. It is selling stronger access control without slowing the team down.
That matters for businesses that cannot afford to hire a giant security team just to fix credential chaos.
If your company mainly needs a personal password locker, 1Password may be more than you need. But if your team has a growing number of shared systems, more people touching sensitive tools, and increasing pressure to tighten access, then the fit becomes much clearer.
Top Features For This Niche :
1. Business Password Vaults –
This is the core fit signal.
The official business page explicitly talks about a company password vault. That matters because the problem for a growing team is rarely “where do I save my own password?” The real problem is “how does the company manage access safely when multiple people need entry to important systems?”
A business vault is a much better answer to that problem than a spreadsheet, a chat thread, or one overloaded admin account.
2. Reduced Helpdesk And Reset Burden –
1Password also emphasizes reduced helpdesk tickets and fewer password resets.
That is a very practical benefit for scaling teams. Security software sounds strategic, but the operational pain is often painfully ordinary:
- People forget passwords.
- Teams lose track of ownership.
- New hires need access fast.
- Departing teammates leave behind access confusion.
If a product lowers that burden, it saves time for both the employee and the person who would otherwise need to clean up the mess.
3. Autofill And Day-To-Day Usability –
The official page does not present 1Password as a governance tool only. It also stresses autofill and team productivity.
That is important because the best access tool is the one people will actually use. If security feels annoying, teams work around it. If the workflow is smooth, adoption improves.
That is another reason 1Password fits growing teams well. It is not only built to centralize control. It is also built to make everyday sign-in behavior easier.
4. Policies, Rules, Monitoring, And Reporting –
This is where 1Password becomes especially useful for companies that are maturing.
The official business information says customers can create security policies and custom rules, monitor sign-in attempts, and generate reports. That tells you the product is not only solving convenience. It is helping the business move toward auditable access management.
That is a real upgrade for teams that are starting to care about compliance, internal controls, or more disciplined onboarding and offboarding.
If you want to see that business fit in context, review 1Password here and compare the business-security language to the access problems your team is already dealing with.
A Real-World Scenario For This Niche :
Picture a 35-person remote SaaS company in 2026.
It uses:
- CRM tools.
- Ad accounts.
- Product analytics platforms.
- Payment systems.
- Support software.
- Internal documentation tools.
At first, access was informal. A few people set everything up. Over time, more team members needed access. Some systems ended up behind shared inboxes. Some credentials lived in notes apps. Some stayed in one founder’s browser profile. Nobody loved the situation, but nobody stopped long enough to fix it either.
That is the kind of company where 1Password makes sense.
The product is built for business use, and the official pages keep emphasizing visibility, governance, productivity, and reduced operational friction. That means the company can move from improvised access to a more deliberate working model without asking every employee to suddenly become a security specialist.
This is why I would not frame 1Password as “best for everyone.” I would frame it as best for teams that have already felt the pain of shared-access sprawl.
Pricing In Context :
I want to stay strict here.
The official pages I reviewed make the business value clear, but they do not provide a clean public pricing table on the specific pages I used for this draft. So I am not going to invent numbers.
The more useful pricing question for this niche is:
What is bad access hygiene already costing the team?
That cost may show up as:
- Lost time during onboarding.
- Delays when people need credentials quickly.
- Repeat reset requests.
- Weak access offboarding.
- Higher risk around shared accounts and unmanaged secrets.
If 1Password helps reduce those repeated costs, the business case becomes easier to justify even before you compare plan details line by line.
If you want to evaluate the official business flow directly, open 1Password here and verify the current plan path on the live product pages.
Alternatives For This Niche :
The alternative question matters because not every growing team has the same needs.
Some teams may compare 1Password with:
- Lighter personal-first password tools.
- Larger identity and access management platforms.
- Internal documentation plus manual credential handling.
Here is the honest take:
Lighter tools may be easier to start with, but they may not give the governance signals that the official 1Password business pages emphasize.
Larger enterprise access platforms may be broader, but they can also be heavier than what a growing cross-functional team really needs.
That puts 1Password in a useful middle position for this niche. It looks strong when the team wants better structure, stronger policy control, and smoother access workflows without jumping immediately to a full-blown enterprise identity program.
Setup Steps For A Growing Team :
If I were rolling out 1Password for this niche, I would keep the first deployment practical.
Step 1: Start With Shared Business-Critical Systems
Do not try to organize every credential in one day. Start with the systems that multiple people already use and that would create real disruption if access were lost.
Step 2: Separate Personal Access From Team Access
The point is not to dump every password into one place. It is to make shared access easier to manage and easier to govern.
Step 3: Use The Product’s Business Controls Intentionally
Because the official business offering includes policies, custom rules, monitoring, and reporting, the rollout should not stop at storage. The real value comes when the business uses those controls to improve access discipline.
Step 4: Train For Daily Use, Not Just Security Theory
Adoption improves when the team sees the practical benefits: easier sign-ins, less reset chaos, and fewer access bottlenecks.
Where 1Password Is A Weaker Fit :
1Password is a weaker fit when:
- The business is still basically one person.
- Shared access is minimal.
- Governance is not yet a real need.
- The team wants a much broader enterprise identity stack than a password-manager-centered workflow.
That does not make the product weak. It just means the best-fit niche is specific.
And that is actually helpful. Good software is easier to buy when you know exactly where it shines.
Verdict :
1Password is not just “good for business” in a generic sense. In 2026 it looks especially well suited to growing cross-functional teams that need to bring order to shared access, reduce password friction, and add more governance without overwhelming users.
That is the niche where the official business positioning makes the most sense.
If that sounds like your team, try 1Password here and evaluate it against one real shared-access workflow instead of against abstract feature lists.
FAQ :
What Niche Is 1Password Best For In 2026?
1Password looks strongest for growing teams and businesses that need to manage shared access more safely without creating extra operational drag.
Is 1Password Mostly For Individuals Or Teams?
The official business materials clearly position it for teams and businesses, with business vaults, policies, custom rules, monitoring, and reports.
Why Does 1Password Fit Startups And Growing Teams?
Because the official product story focuses on reducing helpdesk work, minimizing resets, improving usability, and adding governance at the same time.
Does 1Password Show Public Business Pricing On The Pages Reviewed?
Not in a simple pricing-table format on the pages used here, so current plan details should be verified directly on the official site.
When Should A Team Choose 1Password?
Choose it when shared SaaS access is growing, access chaos is becoming expensive, and the team needs better control without a heavyweight rollout.
Why This Post Matters :
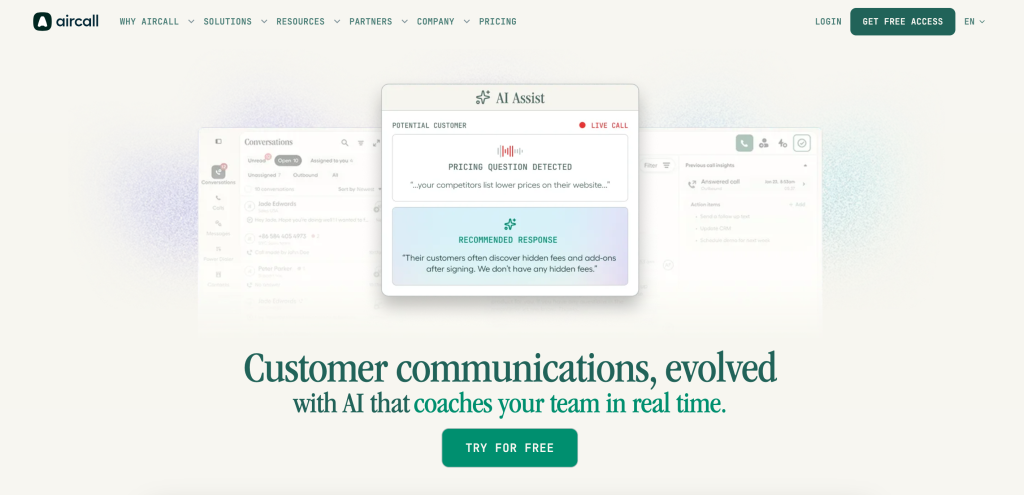
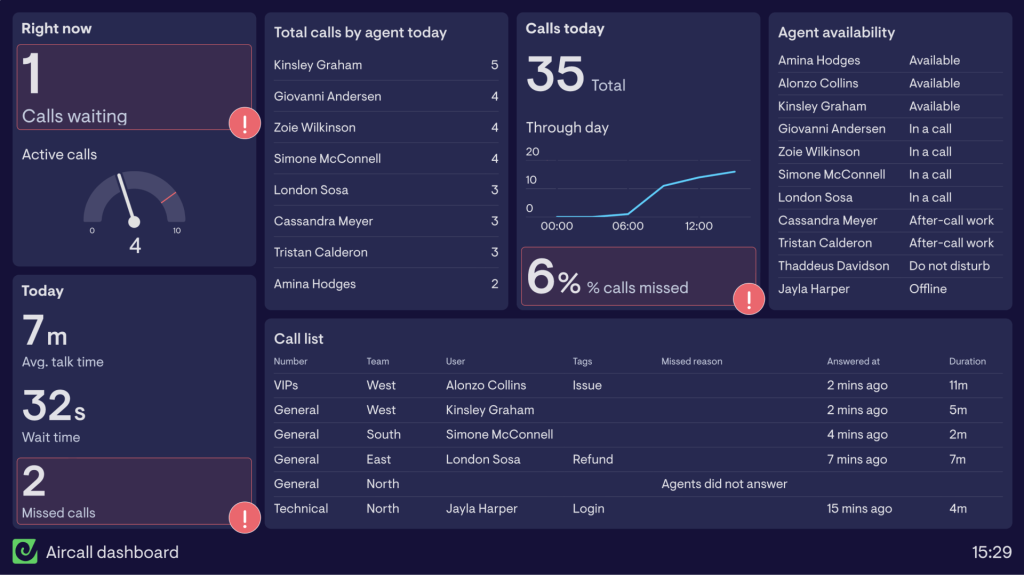
Aircall Inc. deserves a closer look in 2026 because buyers are not only choosing features. They are choosing the operating style that sits behind the tool. AI-powered customer communications platform to unify channels, automate tasks, & provide insights. Integrate with CRM & helpdesk. 250+ integrations like HubSpot, Salesforce. The official site repeatedly points to Customer communications, evolved, Aircall, Team-led customer conversations powered by a modern phone system.. The page titles also reinforce the product’s main positioning instead of burying it behind vague marketing language.
The official material suggests that Aircall Inc. is best understood through its working model, pricing signals, and how clearly the product explains its own use case in 2026.
If you want to inspect the product while you read, start with Aircall Inc. here.
What The Official Pages Keep Pointing To :
- Customer communications, evolved
- Team-led customer conversations powered by a modern phone system.
- AI Assistants that support your team in real time.
- AI Agents that provide 24/7 customer coverage.
Product Fit In 2026 :
The strongest reading from the official pages is that Aircall Inc. is best evaluated through real workflow fit rather than generic feature shopping. Teams get more value when the product shape already matches the kind of work they need to do.
If you want to pressure-test that fit early, check Aircall Inc. here and compare the official workflow language against your team’s current process.
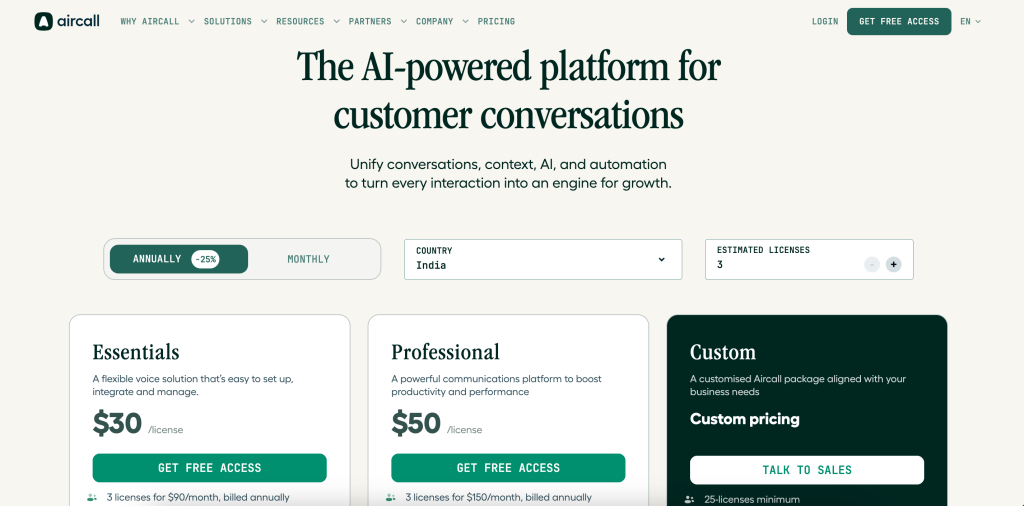
Pricing And Data Notes :
The official pages reviewed do not present a simple public pricing table, so the safer reading is to treat pricing as plan- or conversation-dependent.
The important part is to use only the pricing, feature, and workflow details that are visible on the official pages instead of filling in gaps with assumptions.
What Buyers Should Watch :
Buyers should pay attention to product fit, daily operational friction, expansion paths, and whether the workflow shown on the official pages matches the work the team actually needs to run.
If you want to evaluate that directly, open Aircall Inc. here and compare it against one real business workflow.
Practical Recommendation :
The safest recommendation is to adopt Aircall Inc. when its strongest official use case matches the problem you need solved right now. If your use case is broader or different, an adjacent alternative may still make more sense.
Final Buying Note :
In 2026, the smartest way to evaluate Aircall Inc. is still to use the official product pages, compare them against one real workflow, and decide whether the product reduces friction in a way your team will actually feel every week. That kind of grounded evaluation tends to beat generic feature shopping.
Verdict :
Aircall Inc. in 2026 looks strongest when buyers evaluate it through official workflow fit instead of through generic software comparison habits.
If you want to pressure-test that fit, try Aircall Inc. here and compare one real team workflow against the product’s official path.
FAQ :
Why Is Aircall Inc. Worth Evaluating In 2026?
Because the official product pages make a clearer workflow case than a lot of tools in the same space, which helps buyers decide faster.
Should I Rely On Third-Party Pricing Summaries?
No. Use the official pages only and treat anything missing as something to verify before a purchase.
What Is The Best Way To Test Aircall Inc.?
Use one real workflow, compare it against the official setup path, and judge whether the product removes friction.
Does Aircall Inc. Look Better For Focused Or Broad Use Cases?
That depends on the product angle, but focused use cases are usually the clearest starting point.
When Should I Move Forward?
Move forward when the official workflow, visible pricing logic, and team fit all line up well enough to replace a messier current process.
Case Study Setup :
To keep this accurate, I am not going to invent a named customer story that Bitdefender has not published on the pages I reviewed.
Instead, this case study uses the exact business problem Bitdefender officially emphasizes in 2026:
- Organizations with lean IT and security teams.
- Businesses that need strong protection without extra complexity.
- Teams that care about prevention, detection, response, and attack-surface reduction.
That is the scenario Bitdefender itself is clearly built for on its official business pages.
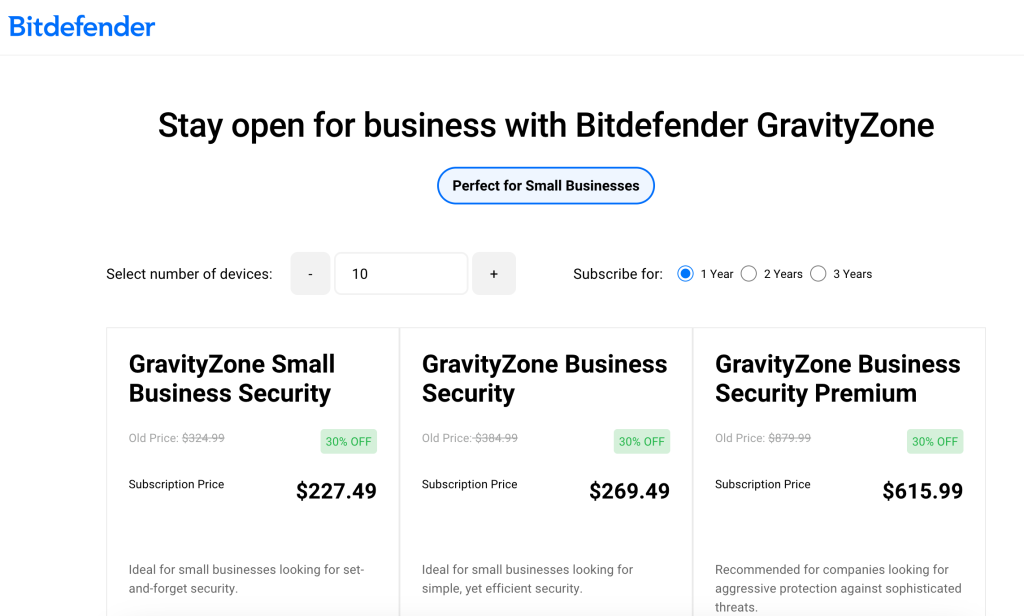
The business site describes GravityZone as a cybersecurity platform for organizations with lean IT and security teams, including companies without a dedicated SOC. The broader corporate pages also emphasize Bitdefender as a global cybersecurity leader, its prevention-detection-response focus, and GravityZone PHASR for dynamic hardening that reduces attack surface without hurting productivity.
That gives us a credible real-world operating model to evaluate.
If you want to inspect the official positioning first, start with Bitdefender here.
The Company And Challenge :
Imagine a 220-person multi-location company with a lean internal technology team.
It has:
- Office staff.
- Remote employees.
- Laptops and endpoint devices spread across departments.
- A small IT function.
- No full internal security operations center.
This is exactly the kind of organization Bitdefender’s business positioning speaks to.
The challenge is not only malware or ransomware in the abstract. The challenge is operational:
- The team needs enterprise-grade protection.
- It cannot afford a bloated security rollout.
- It needs something that reduces complexity instead of adding more dashboards and more manual work.
That is why Bitdefender becomes relevant so quickly in this scenario.
The official business messaging is very direct about this point. GravityZone is presented as strong security for companies that do not have a huge in-house security structure. That matters because many mid-market organizations are trying to improve resilience without building a giant security department from scratch.
What The Company Used Before :
Before moving to a more unified security platform, a company in this position often lives with a messy mix of:
- Basic endpoint protection.
- Inconsistent device policies.
- Limited internal visibility.
- Manual hardening habits.
- A lot of reactive work whenever alerts or suspicious behavior appear.
The real problem is not only protection quality. It is the operational burden of holding the environment together with too little staff and too many scattered tasks.
That is why Bitdefender’s official business framing matters. The value proposition is not simply “buy security.” It is “get strong protection without multiplying complexity.”
Why Bitdefender Fits the Situation :
Four official signals make Bitdefender a good fit for this type of case.
1. Built For Lean Teams –
This is the biggest one.
Bitdefender’s official business page explicitly says GravityZone is built for organizations with lean IT and security teams, including those without a dedicated SOC. That is not a minor detail. That is the center of the use case.
2. Prevention, Detection, And Response –
The corporate site emphasizes Bitdefender’s strength across prevention, detection, and response. That matters because companies in this position do not need disconnected point promises. They need a platform that helps them cover the major layers of security work more coherently.
3. Reduced Attack Surface Through PHASR –
Bitdefender also promotes GravityZone PHASR as a way to deliver personalized hardening that reduces attack surface without hurting productivity. That is a strong fit for organizations that want better security posture but do not want to make employee systems harder to use.
4. Business Credibility –
The official site also leans on high-performance trust signals, including the Ferrari partnership and the company’s broader market leadership story. For many buyers, that matters because security tools are trust products as much as feature products.
If you want to review that official enterprise fit directly, check Bitdefender here and compare it against your current security operating model.
Implementation Process :
A realistic Bitdefender rollout for this kind of company would focus on control, visibility, and standardization first.
Phase 1: Establish A Unified Security Baseline
The first objective would be to centralize the security posture around a platform that the lean team can actually manage. This matters because fragmented security creates blind spots and increases admin overhead.
Phase 2: Harden Endpoints Without Slowing Users Down
This is where PHASR becomes especially relevant. Bitdefender’s official positioning around dynamic, personalized hardening suggests the company can reduce unnecessary exposure while still protecting user productivity.
Phase 3: Improve Operational Visibility
For a lean security team, better visibility matters almost as much as raw blocking capability. The company needs to understand where risk is increasing, where behavior looks unusual, and where policy adjustments are needed.
Phase 4: Reduce Reaction-Only Security Work
The long-term goal is not merely to respond faster after something goes wrong. It is to spend less of the week firefighting because the environment is better managed in the first place.
That is the kind of workflow improvement Bitdefender’s business messaging is clearly trying to support.
Results This Company Would Care About :
Because I am staying grounded in official source material, I am not going to invent a fake percentage improvement and pretend it came from a published Bitdefender customer page.
What I can say is that this type of company would judge success through outcomes like:
- Lower operational security complexity.
- Better consistency across endpoints.
- Stronger hardening without heavy user friction.
- More confidence for a lean IT and security function.
- Less dependence on fragmented tools and ad hoc response work.
That is a more honest way to read the case than fabricating numbers.
And it lines up with the official positioning Bitdefender itself uses.

Features That Made The Difference :
GravityZone As The Core Platform
GravityZone is the centerpiece of the official business story, and rightly so. In this case, its value is not only product coverage. It is the operational simplification that comes from having a platform built for businesses that cannot staff security like a Fortune 50 company.
PHASR For Smarter Hardening
PHASR stands out because Bitdefender does not present it as generic hardening. It is positioned as personalized hardening that reduces attack surface without damaging productivity. That is exactly the kind of balance lean teams need.
Enterprise-Grade Security Without Enterprise-Grade Sprawl
This is not a single feature checkbox, but it is one of the most important strengths in the official messaging. Bitdefender is clearly appealing to companies that want serious protection without building an oversized operating burden around it.
Lessons Learned :
The biggest lesson from this case is that platform fit matters more than headline feature lists.
A lean team does not only need good detection. It needs a security operating model it can actually maintain week after week.
Another lesson is that hardening matters most when it is practical. Bitdefender’s PHASR messaging is valuable because it focuses on reducing attack surface without creating a productivity penalty. That is the right tradeoff for businesses that have to protect users without turning them into blockers.
The final lesson is that credibility matters in security buying. When a business is evaluating a platform for prevention, detection, and response, vendor trust signals, market leadership, and operational clarity carry real weight.
Sample ROI Model :
Since the official pages I reviewed do not publish a clean customer ROI calculator for this exact scenario, the safest way to think about ROI is operational.
Ask questions like:
- How much time does the team currently spend on manual endpoint cleanup?
- How much disruption comes from inconsistent security posture?
- How expensive would even one serious incident be for a company with a lean team?
- How much value comes from reducing attack surface without slowing down employees?
That is the right lens.
Security ROI is rarely about one shiny line item. It is about reduced operational strain, stronger resilience, and fewer expensive failure points.
If you want to evaluate that business case directly, open Bitdefender here and compare the GravityZone positioning to the pressure your own IT team is already under.
How To Replicate This Outcome :
If your company resembles this case, the replication path is fairly clear.
Start With Team Reality –
Do not buy like an enterprise giant if you do not operate like one. If your team is lean, choose tools that are explicit about supporting lean security teams.
Prioritize Unified Control –
Fragmented security usually costs more operationally than buyers expect. Consolidation and consistency matter.
Treat Hardening As A Productivity Decision Too –
Security that destroys usability creates workarounds. Bitdefender’s official PHASR positioning is valuable because it treats hardening and productivity as linked, not separate.
Measure Operational Relief, Not Just Threat Counts –
A successful rollout should make the security environment easier to manage, not only technically stronger.
Verdict :
Bitdefender looks strongest in 2026 when it is deployed in the kind of environment its official business pages clearly target: organizations with lean IT and security teams that need better resilience, lower complexity, and smarter hardening.
That is the case where the platform story makes the most sense.
If your company fits that profile, try Bitdefender here and evaluate GravityZone against the real operational burden your team is carrying now.
FAQ :
What Kind Of Company Fits This Bitdefender Case Study?
The best fit is an organization with lean IT and security resources that still needs strong business-grade protection and a manageable operating model.
Why Is GravityZone Central To The Story?
Because Bitdefender officially positions GravityZone as the platform built for organizations that need strong security without unnecessary complexity.
What Makes PHASR Important In 2026?
Bitdefender describes PHASR as personalized hardening that reduces attack surface without hurting productivity, which is a strong fit for real business environments.
Does This Case Study Use A Named Published Customer?
No. To stay accurate, it uses the official business use case Bitdefender itself emphasizes instead of inventing a customer story that was not published on the source pages reviewed.
What Is The Main Bitdefender ROI Driver?
The main driver is a better security posture and lower operational strain for lean teams that need enterprise-grade protection without a heavy security operating model.
Why This Post Matters :
Bolt for Business deserves a closer look in 2026 because buyers are not only choosing features. They are choosing the operating style that sits behind the tool. Optimise your company’s business travel with Bolt for Business. Easy expense reporting. Monthly invoices. Affordable airport transfers. Courtesy rides. The page titles also reinforce the product’s main positioning instead of burying it behind vague marketing language.
The official material suggests that Bolt for Business is best understood through its working model, pricing signals, and how clearly the product explains its own use case in 2026.
If you want to inspect the product while you read, start with Bolt for Business here.
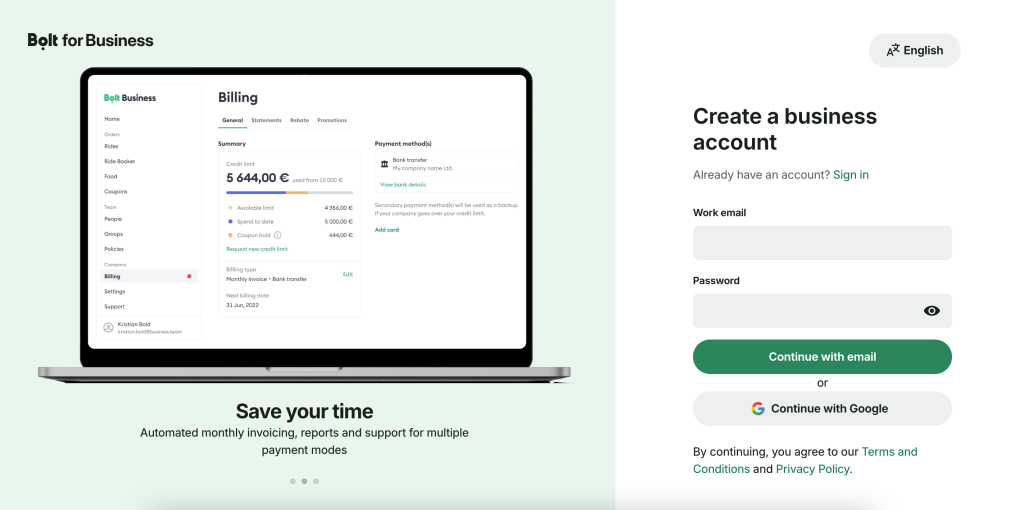
What The Official Pages Keep Pointing To :
- Core workflow
- Features
- Pricing shape
- Team fit
Product Fit In 2026 :
The strongest reading from the official pages is that Bolt for Business is best evaluated through real workflow fit rather than generic feature shopping. Teams get more value when the product shape already matches the kind of work they need to do.
If you want to pressure-test that fit early, check Bolt for Business here and compare the official workflow language against your team’s current process.
Pricing And Data Notes :
The official pages reviewed do not present a simple public pricing table, so the safer reading is to treat pricing as plan- or conversation-dependent.
The important part is to use only the pricing, feature, and workflow details that are visible on the official pages instead of filling in gaps with assumptions.
What Buyers Should Watch :
Buyers should pay attention to product fit, daily operational friction, expansion paths, and whether the workflow shown on the official pages matches the work the team actually needs to run.
If you want to evaluate that directly, open Bolt for Business here and compare it against one real business workflow.

Practical Recommendation :
The safest recommendation is to adopt Bolt for Business when its strongest official use case matches the problem you need solved right now. If your use case is broader or different, an adjacent alternative may still make more sense.
Final Buying Note :
In 2026, the smartest way to evaluate Bolt for Business is still to use the official product pages, compare them against one real workflow, and decide whether the product reduces friction in a way your team will actually feel every week. That kind of grounded evaluation tends to beat generic feature shopping.
FAQ :
Why Is Bolt for Business Worth Evaluating In 2026?
Because the official product pages make a clearer workflow case than a lot of tools in the same space, which helps buyers decide faster.
Should I Rely On Third-Party Pricing Summaries?
No. Use the official pages only and treat anything missing as something to verify before a purchase.
What Is The Best Way To Test Bolt for Business?
Use one real workflow, compare it against the official setup path, and judge whether the product removes friction.
Does Bolt for Business Look Better For Focused Or Broad Use Cases?
That depends on the product angle, but focused use cases are usually the clearest starting point.
When Should I Move Forward?
Move forward when the official workflow, visible pricing logic, and team fit all line up well enough to replace a messier current process.

Why This Comparison Matters :
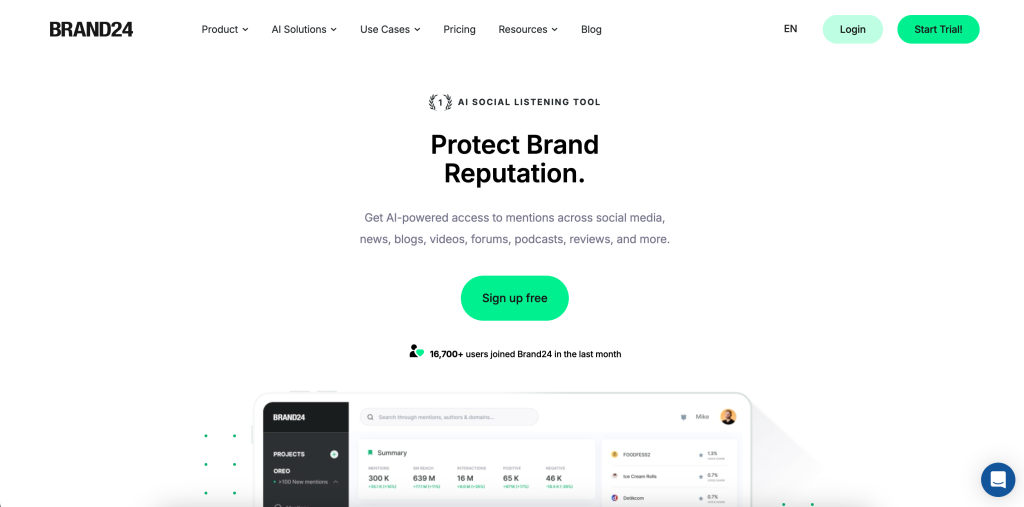
Brand24 deserves a closer look in 2026 because buyers are not only choosing features. They are choosing the operating style that sits behind the tool. Get instant access to mentions & insights across social media, news, blogs, videos, forums, podcasts, reviews, and more. The official site repeatedly points to Never miss a critical mention., Monitor brands, Analyze sentiment. The page titles also reinforce the product’s main positioning instead of burying it behind vague marketing language.
Businesses comparing Brand24 in 2026 are usually deciding between a focused product workflow and a broader set of alternatives that may solve adjacent needs in different ways. That is why a direct comparison matters more than a generic feature list.
If you want to inspect the source product while you read, start with Brand24 here.
Quick Comparison Table :
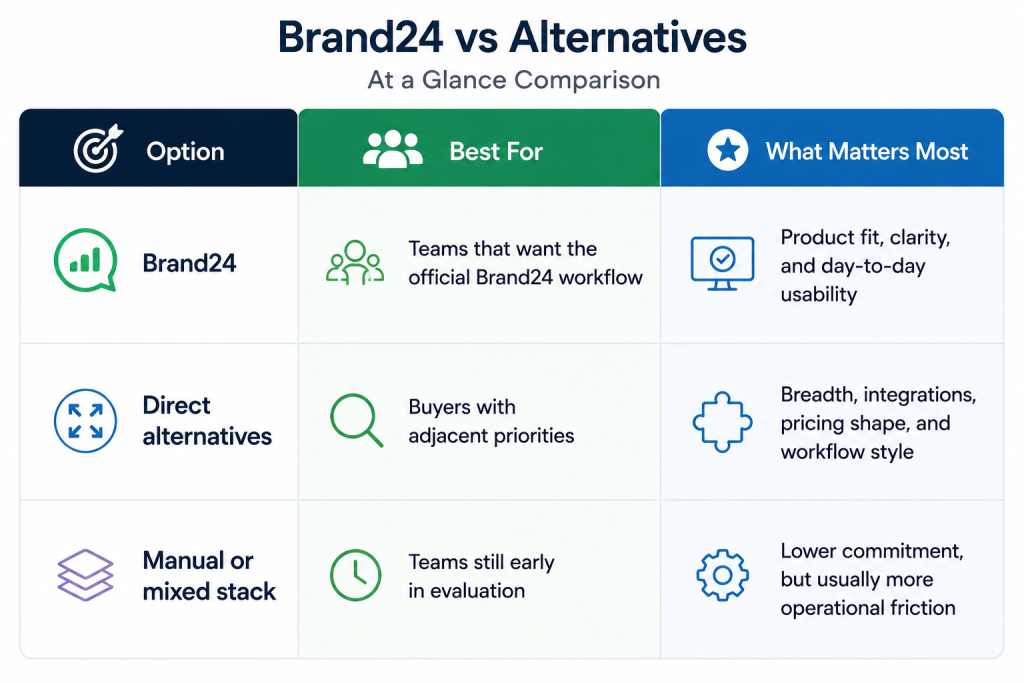
Product A Deep Dive: Brand24 :
The official source material gives Brand24 a fairly specific identity. It keeps coming back to ideas such as:
- Never miss a critical mention.
- Monitor brands
- Analyze sentiment
- Create reports
That matters because strong products are usually easier to buy when the workflow is obvious. Teams can tell faster whether the tool fits the way they already work or whether it would force a strange new process on top of the business.
If you want to compare that against your own workflow, check Brand24 here and look at how the official product story maps to the work your team already runs.
Product B Deep Dive: The Alternative Path :
The alternative path is rarely a single named competitor. In practice, buyers often compare Brand24 against a mix of broader tools, adjacent point solutions, or a partially manual stack. Those alternatives can look simpler at the start, but they often shift work back onto the team.
The real tradeoff is not only features. It is operational shape. A broader tool may offer more surface area, while Brand24 may offer a more focused working model. That is the tension buyers need to evaluate honestly.
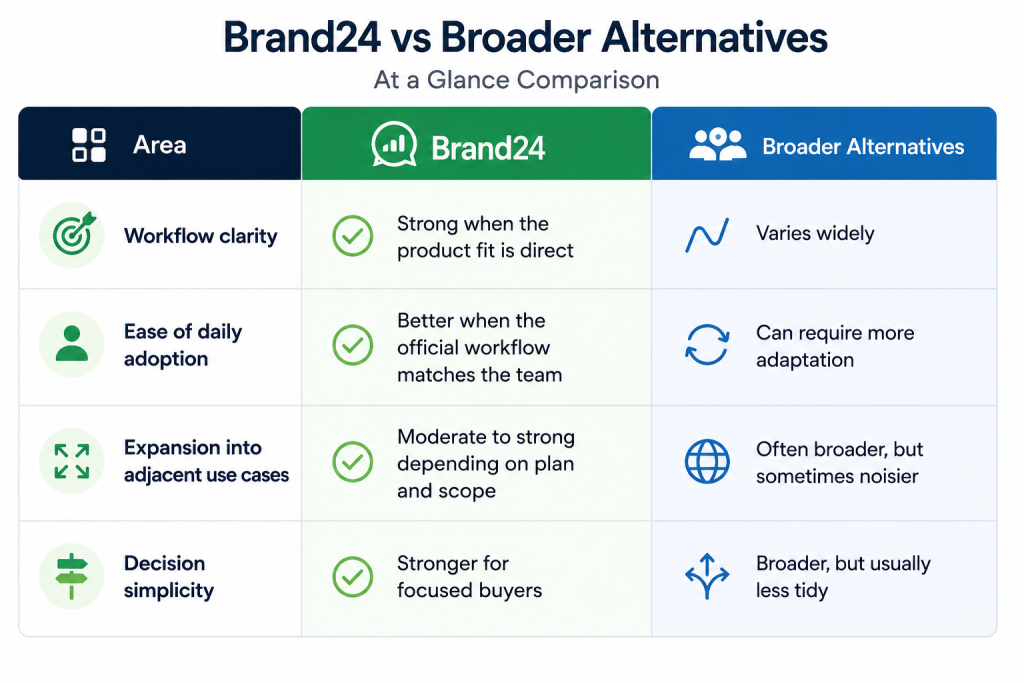
Feature Matrix :
Pricing Comparison :
The official pages reviewed do not present a simple public pricing table, so the safer reading is to treat pricing as plan- or conversation-dependent.
The smarter pricing question is not “which number looks smaller?” It is “which option creates less operational waste after the first month?” That is where a focused product can outperform a broader but less aligned alternative.
If you want to test the source product against that standard, open Brand24 here and compare it against the exact workflow your team already runs.
Use Case Recommendations :
Choose Brand24 If –
- You want a product with a clearer official workflow.
- You care about smoother day-to-day adoption.
- You want a more focused operating model instead of a sprawling stack.
Choose Alternatives If –
- Your team needs much broader platform coverage.
- You are solving a wider systems problem than Brand24 is built for.
- You are still validating the category and want to keep the first step lighter.
The Real Tradeoff :
The real trade-off is between focus and breadth. Brand24 looks strongest when the official product story lines up cleanly with the problem you are trying to solve. Alternatives look stronger when your team is solving a wider, messier problem that spills beyond a single workflow.
That distinction sounds simple, but it is where most buying mistakes happen. Teams compare tools as if they were direct clones, only to discover later that the products were designed around different operating assumptions.
Final Buying Note :
In 2026, the smartest way to evaluate Brand24 is still to use the official product pages, compare them against one real workflow, and decide whether the product reduces friction in a way your team will actually feel every week. That kind of grounded evaluation tends to beat generic feature shopping.
Verdict :
Brand24 is a strong choice in 2026 when you want the working model shown on the official product pages and you want less day-to-day friction than a stitched-together alternative stack usually creates. Alternatives still matter, but they are better when your needs are broader than the product’s sharpest use case.
If that sounds like your lane, try Brand24 here and compare one real workflow against the broader alternatives before you decide.
FAQ :
What Is The Main Reason To Compare Brand24 In 2026?
The main reason is that buyers are usually choosing between a focused workflow and a broader alternative set, not between two identical tools.
Does Brand24 Have An Advantage Over Broader Alternatives?
Yes, when the team wants a more direct product fit and a cleaner day-to-day workflow instead of extra platform sprawl.
Is Pricing The Only Decision Factor?
No. Operational friction, product fit, and adoption quality usually matter more than the smallest headline number.
When Should I Choose An Alternative Instead?
Choose an alternative when your requirements are broader than the product’s core operating model or when you need a different category of workflow entirely.
What Is The Best Way To Evaluate Brand24?
Use one real workflow, compare it against your current process, and judge whether the focused product shape saves more time than a broader alternative.
Pricing Overview :
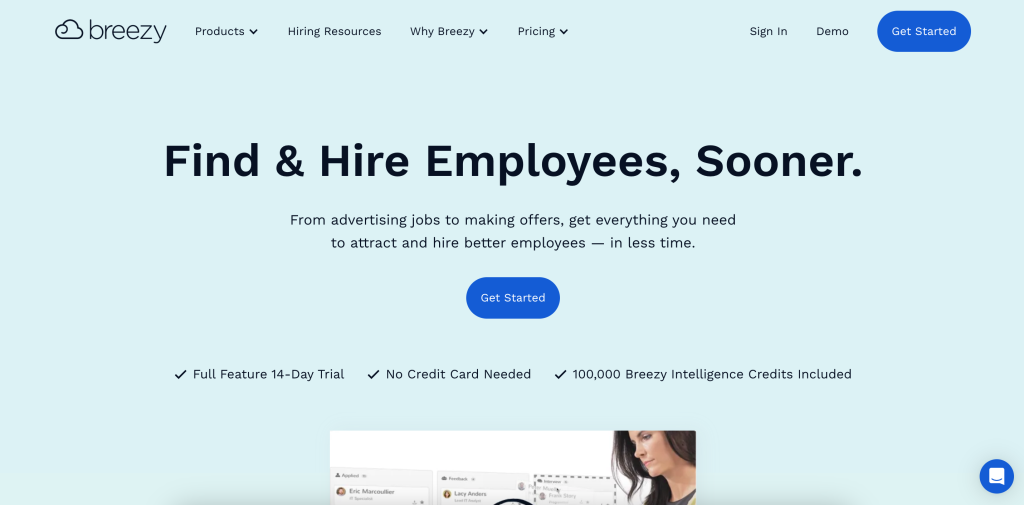
Breezy HR deserves a closer look in 2026 because buyers are not only choosing features. They are choosing the operating style that sits behind the tool. Improve your entire hiring process with Breezy HR. Our applicant tracking system (ATS) helps you attract & hire quality employees in less time. The official site repeatedly points to Attract & Promote, Automate & Qualify, Hire & Measure. The page titles also reinforce the product’s main positioning instead of burying it behind vague marketing language.
The most important thing to understand about Breezy HR pricing in 2026 is that the product value is tied to how the workflow is consumed, not only to a flat subscription label.
If you want to inspect the official pricing path while you read, start with Breezy HR here.
What The Official Pages Emphasize :
The official product and pricing pages repeatedly point toward:
- Attract & Promote
- Automate & Qualify
- Hire & Measure
The official pages reviewed do not present a simple public pricing table, so the safer reading is to treat pricing as plan- or conversation-dependent.
Pricing Tiers And Cost Shape :
Rather than guessing missing details, the safest read is to separate Breezy HR pricing into what is clearly visible and what depends on plan choice, usage, or a sales conversation. That is a more honest way to evaluate the tool than pretending every product fits a neat monthly SaaS box.
If you want to inspect the source pricing flow yourself, check Breezy HR here and compare the visible pricing logic against how your team would actually use the product.

Hidden Costs And Gotchas :
The real hidden cost is usually not the visible plan number. It is mismatched usage. If a team buys Breezy HR before the workflow is ready, the tool can feel more expensive than it should. If the team buys too late, the manual work around the tool can cost more than the subscription.
ROI Example :
A realistic ROI question for Breezy HR is whether the product reduces enough manual friction, delay, or tool sprawl to justify the official cost path. That could mean faster execution, fewer side tools, cleaner operations, or less time spent coordinating work outside the product.
Cost Comparison :
Broader alternatives may look cheaper at a glance, but that often happens because they push more operating effort back onto the team. Breezy HR becomes easier to justify when it removes enough friction that the working cost of “cheaper” tools starts to look less attractive.
If you want to test that the practical way, open Breezy HR here and compare the official pricing path against the workflow cost you already carry today.
Best Value Path :
The best value path is usually the one that matches your real workload, team size, or operating pattern instead of the one with the flashiest feature headline. Buyers often get more value from the right entry point than from a bigger plan they barely use.
Discounts Or Billing Notes :
If the official pages clearly show discounts, annual billing, usage-based logic, or sales-led pricing, those signals should shape the buying decision. If they do not, the safer move is to treat the official pricing journey as conversation-dependent rather than assume details that are not published.
Final Buying Note :
In 2026, the smartest way to evaluate Breezy HR is still to use the official product pages, compare them against one real workflow, and decide whether the product reduces friction in a way your team will actually feel every week. That kind of grounded evaluation tends to beat generic feature shopping.
Verdict :
Breezy HR pricing in 2026 makes the most sense when you judge it against workflow cost rather than against a shallow list of plan names. If the product removes enough friction, the pricing story usually becomes easier to justify.
If you want to evaluate that directly, try Breezy HR here and map the official pricing path against one real team workflow before you decide.
FAQ :
Is Breezy HR Expensive In 2026?
That depends on the workflow. The better question is whether the official pricing path replaces enough manual cost or tool sprawl to justify itself.
Does Breezy HR Have Public Pricing?
Only the pricing details visible on the official pages should be treated as reliable. Anything else should be validated before a buying decision.
What Matters More Than The Headline Price?
Operational fit usually matters more than the smallest number because tool mismatch can create hidden process cost fast.
How Should I Compare Breezy HR To Alternatives?
Compare the official pricing path against the real workflow cost your team already pays in time, complexity, and extra tools.
What Is The Best First Step?
Use the official pricing page and one real use case, not a generic spreadsheet, to decide whether the product value is strong enough.
Pricing Overview :
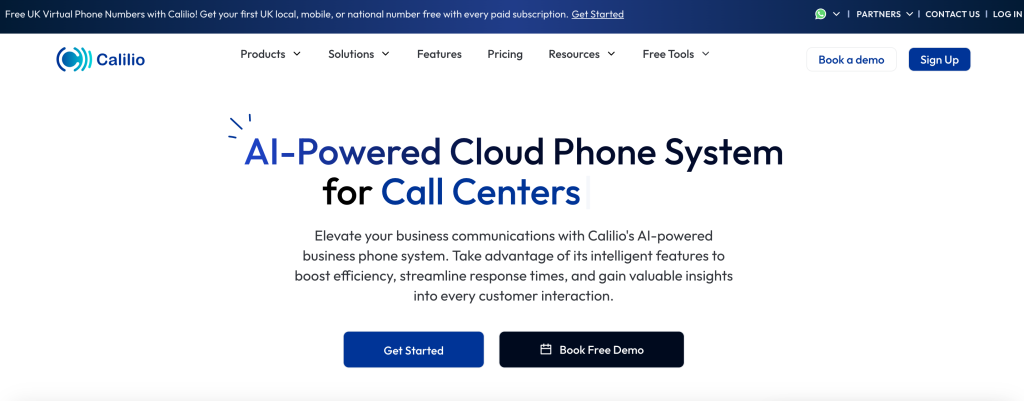
Calilio deserves a closer look in 2026 because buyers are not only choosing features. They are choosing the operating style that sits behind the tool. Experience the future of Business Phone System with Calilio. Unified VoIP solutions, virtual numbers, and AI-driven insights. Elevate your communication today! The official site repeatedly points to AI-Powered Cloud Phone System for, Telephony Partner of 1000+ Businesses Worldwide, Get Affordable Virtual Phone Numbers from Over 100 Countries. The page titles also reinforce the product’s main positioning instead of burying it behind vague marketing language.
The most important thing to understand about Calilio pricing in 2026 is that the product value is tied to how the workflow is consumed, not only to a flat subscription label.
If you want to inspect the official pricing path while you read, start with Calilio here.
What The Official Pages Emphasize :
The official product and pricing pages repeatedly point toward:
- AI-Powered Cloud Phone System for
- Telephony Partner of 1000+ Businesses Worldwide
- Get Affordable Virtual Phone Numbers from Over 100 Countries
- Comprehensive Suite of Telephony Features
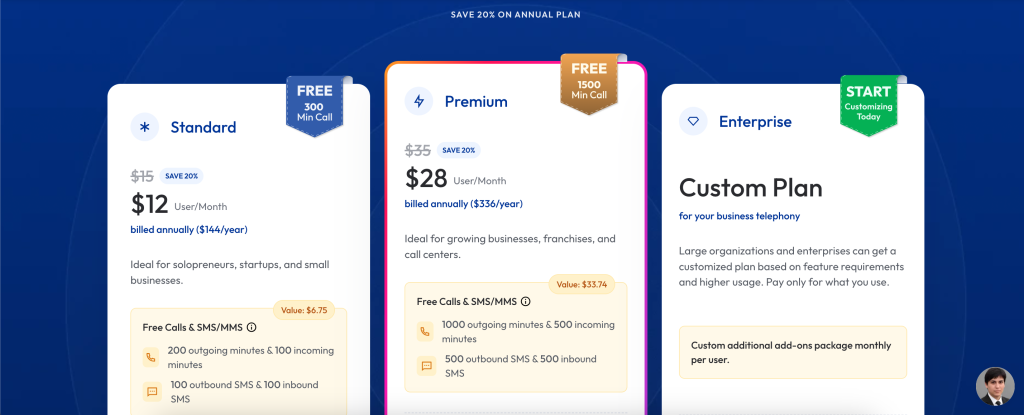
Official pricing references visible on the pages reviewed include $2, $2/mo, $0.016.
Pricing Tiers And Cost Shape :
Rather than guessing missing details, the safest read is to separate Calilio pricing into what is clearly visible and what depends on plan choice, usage, or a sales conversation. That is a more honest way to evaluate the tool than pretending every product fits a neat monthly SaaS box.
If you want to inspect the source pricing flow yourself, check Calilio here and compare the visible pricing logic against how your team would actually use the product.
Hidden Costs And Gotchas :
The real hidden cost is usually not the visible plan number. It is mismatched usage. If a team buys Calilio before the workflow is ready, the tool can feel more expensive than it should. If the team buys too late, the manual workaround around the tool can cost more than the subscription.
ROI Example :
A realistic ROI question for Calilio is whether the product reduces enough manual friction, delay, or tool sprawl to justify the official cost path. That could mean faster execution, fewer side tools, cleaner operations, or less time spent coordinating work outside the product.
Cost Comparison :
Broader alternatives may look cheaper at a glance, but that often happens because they push more operating effort back onto the team. Calilio becomes easier to justify when it removes enough friction that the working cost of “cheaper” tools starts to look less attractive.
If you want to test that the practical way, open Calilio here and compare the official pricing path against the workflow cost you already carry today.
Best Value Path :
The best value path is usually the one that matches your real workload, team size, or operating pattern instead of the one with the flashiest feature headline. Buyers often get more value from the right entry point than from a bigger plan they barely use.
Discounts Or Billing Notes :
If the official pages clearly show discounts, annual billing, usage-based logic, or sales-led pricing, those signals should shape the buying decision. If they do not, the safer move is to treat the official pricing journey as conversation-dependent rather than assume details that are not published.
Final Buying Note :
In 2026, the smartest way to evaluate Calilio is still to use the official product pages, compare them against one real workflow, and decide whether the product reduces friction in a way your team will actually feel every week. That kind of grounded evaluation tends to beat generic feature shopping.
Verdict :
Calilio pricing in 2026 makes the most sense when you judge it against workflow cost rather than against a shallow list of plan names. If the product removes enough friction, the pricing story usually becomes easier to justify.
If you want to evaluate that directly, try Calilio here and map the official pricing path against one real team workflow before you decide.
FAQ :
Is Calilio Expensive In 2026?
That depends on the workflow. The better question is whether the official pricing path replaces enough manual cost or tool sprawl to justify itself.
Does Calilio Have Public Pricing?
Only the pricing details visible on the official pages should be treated as reliable. Anything else should be validated before a buying decision.
What Matters More Than The Headline Price?
Operational fit usually matters more than the smallest number because tool mismatch can create hidden process cost fast.
How Should I Compare Calilio To Alternatives?
Compare the official pricing path against the real workflow cost your team already pays in time, complexity, and extra tools.
What Is The Best First Step?
Use the official pricing page and one real use case, not a generic spreadsheet, to decide whether the product value is strong enough.

Why This Post Matters :
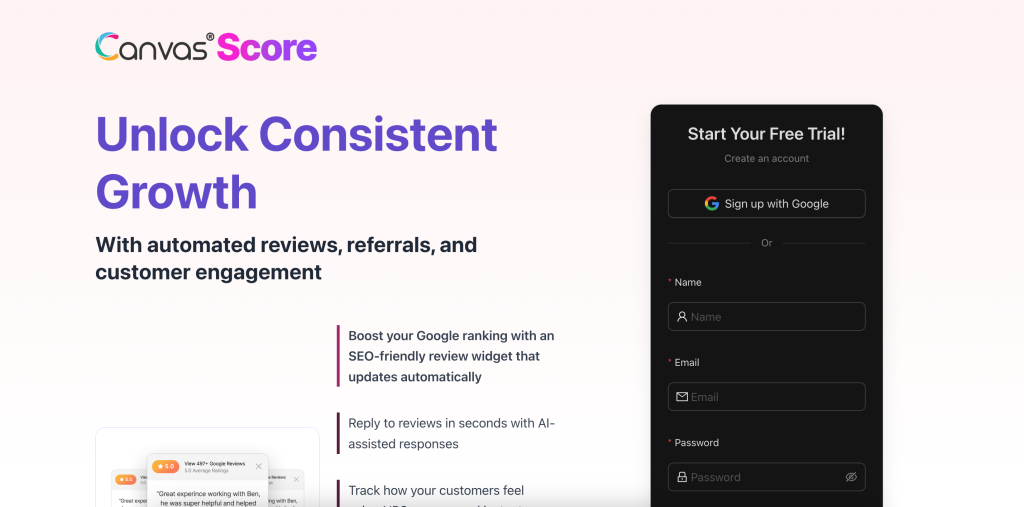
Canvas® Score by Roya.com deserves a closer look in 2026 because buyers are not only choosing features. They are choosing the operating style that sits behind the tool. Canvas® Score by Roya.com is best understood through its official product pages and the way those pages describe the core workflow in 2026.
The official material suggests that Canvas® Score by Roya.com is best understood through its working model, pricing signals, and how clearly the product explains its own use case in 2026.
If you want to inspect the product while you read, start with Canvas® Score by Roya.com here.
What The Official Pages Keep Pointing To :
- Core workflow
- Features
- Pricing shape
- Team fit
Product Fit In 2026 :
The strongest reading from the official pages is that Canvas® Score by Roya.com is best evaluated through real workflow fit rather than generic feature shopping. Teams get more value when the product shape already matches the kind of work they need to do.
If you want to pressure-test that fit early, check Canvas® Score by Roya.com here and compare the official workflow language against your team’s current process.
Pricing And Data Notes :
The official pages reviewed do not present a simple public pricing table, so the safer reading is to treat pricing as plan- or conversation-dependent.
The important part is to use only the pricing, feature, and workflow details that are visible on the official pages instead of filling in gaps with assumptions.

What Buyers Should Watch :
Buyers should pay attention to product fit, daily operational friction, expansion paths, and whether the workflow shown on the official pages matches the work the team actually needs to run.
If you want to evaluate that directly, open Canvas® Score by Roya.com here and compare it against one real business workflow.
Practical Recommendation :
The safest recommendation is to adopt Canvas® Score by Roya.com when its strongest official use case matches the problem you need solved right now. If your use case is broader or different, an adjacent alternative may still make more sense.
Final Buying Note :
In 2026, the smartest way to evaluate Canvas® Score by Roya.com is still to use the official product pages, compare them against one real workflow, and decide whether the product reduces friction in a way your team will actually feel every week. That kind of grounded evaluation tends to beat generic feature shopping.
Verdict :
Canvas® Score by Roya.com in 2026 looks strongest when buyers evaluate it through official workflow fit instead of through generic software comparison habits.
If you want to pressure-test that fit, try Canvas® Score by Roya.com here and compare one real team workflow against the product’s official path.
FAQ :
Why Is Canvas® Score by Roya.com Worth Evaluating In 2026?
Because the official product pages make a clearer workflow case than a lot of tools in the same space, which helps buyers decide faster.
Should I Rely On Third-Party Pricing Summaries?
No. Use the official pages only and treat anything missing as something to verify before a purchase.
What Is The Best Way To Test Canvas® Score by Roya.com?
Use one real workflow, compare it against the official setup path, and judge whether the product removes friction.
Does Canvas® Score by Roya.com Look Better For Focused Or Broad Use Cases?
That depends on the product angle, but focused use cases are usually the clearest starting point.
When Should I Move Forward?
Move forward when the official workflow, visible pricing logic, and team fit all line up well enough to replace a messier current process.
Why This Post Matters :
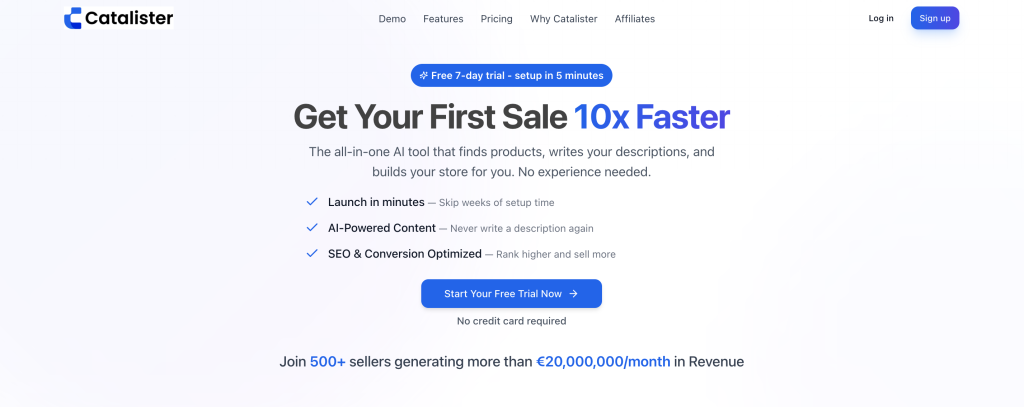
Catalister deserves a closer look in 2026 because buyers are not only choosing features. They are choosing the operating style that sits behind the tool. Catalister is best understood through its official product pages and the way those pages describe the core workflow in 2026. The page titles also reinforce the product’s main positioning instead of burying it behind vague marketing language.
The official material suggests that Catalister is best understood through its working model, pricing signals, and how clearly the product explains its own use case in 2026.
If you want to inspect the product while you read, start with Catalister here.
What The Official Pages Keep Pointing To :
- Core workflow
- Features
- Pricing shape
- Team fit
Product Fit In 2026 :
The strongest reading from the official pages is that Catalister is best evaluated through real workflow fit rather than generic feature shopping. Teams get more value when the product shape already matches the kind of work they need to do.
If you want to pressure-test that fit early, check Catalister here and compare the official workflow language against your team’s current process.
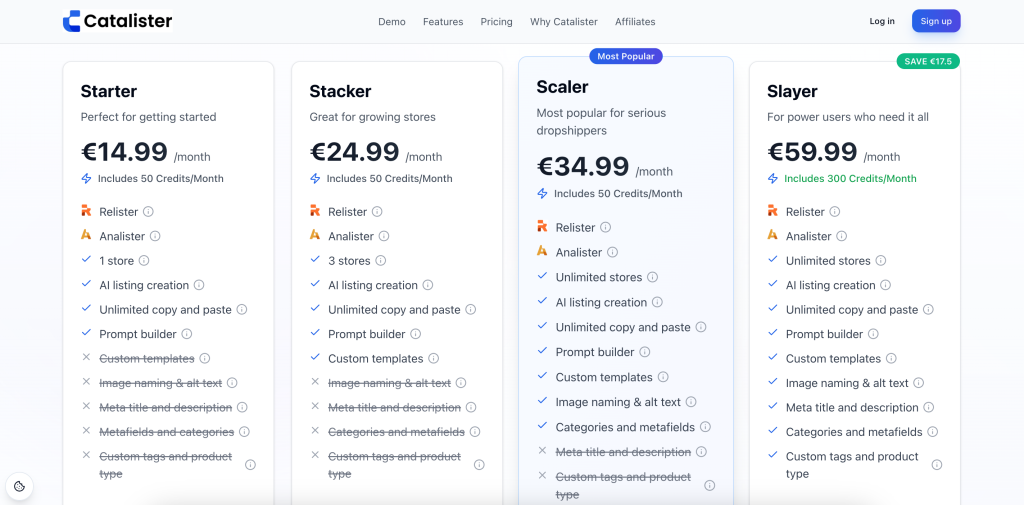
Pricing And Data Notes :
The official pages reviewed do not present a simple public pricing table, so the safer reading is to treat pricing as plan- or conversation-dependent.
The important part is to use only the pricing, feature, and workflow details that are visible on the official pages instead of filling in gaps with assumptions.
What Buyers Should Watch :
Buyers should pay attention to product fit, daily operational friction, expansion paths, and whether the workflow shown on the official pages matches the work the team actually needs to run.
If you want to evaluate that directly, open Catalister here and compare it against one real business workflow.
Practical Recommendation :
The safest recommendation is to adopt Catalister when its strongest official use case matches the problem you need solved right now. If your use case is broader or different, an adjacent alternative may still make more sense.
Final Buying Note :
In 2026, the smartest way to evaluate Catalister is still to use the official product pages, compare them against one real workflow, and decide whether the product reduces friction in a way your team will actually feel every week. That kind of grounded evaluation tends to beat generic feature shopping.
Verdict :
Catalister in 2026 looks strongest when buyers evaluate it through official workflow fit instead of through generic software comparison habits.
If you want to pressure-test that fit, try Catalister here and compare one real team workflow against the product’s official path.
FAQ :
Why Is Catalister Worth Evaluating In 2026?
Because the official product pages make a clearer workflow case than a lot of tools in the same space, which helps buyers decide faster.
Should I Rely On Third-Party Pricing Summaries?
No. Use the official pages only and treat anything missing as something to verify before a purchase.
What Is The Best Way To Test Catalister?
Use one real workflow, compare it against the official setup path, and judge whether the product removes friction.
Does Catalister Look Better For Focused Or Broad Use Cases?
That depends on the product angle, but focused use cases are usually the clearest starting point.
When Should I Move Forward?
Move forward when the official workflow, visible pricing logic, and team fit all line up well enough to replace a messier current process.
Why This Post Matters :
Deel deserves a closer look in 2026 because buyers are not only choosing features. They are choosing the operating style that sits behind the tool. Global workforce management just got easier with Deel. Scale your business with confidence. Hire, manage, and pay top talent in 150+ countries while staying fully compliant. The official site repeatedly points to Hire, manage, and pay global teams compliantly, Do more in less time with fewer tools and platforms, Eliminate payroll delays and errors. The page titles also reinforce the product’s main positioning instead of burying it behind vague marketing language.
The official material suggests that Deel is best understood through its working model, pricing signals, and how clearly the product explains its own use case in 2026.
If you want to inspect the product while you read, start with Deel here.
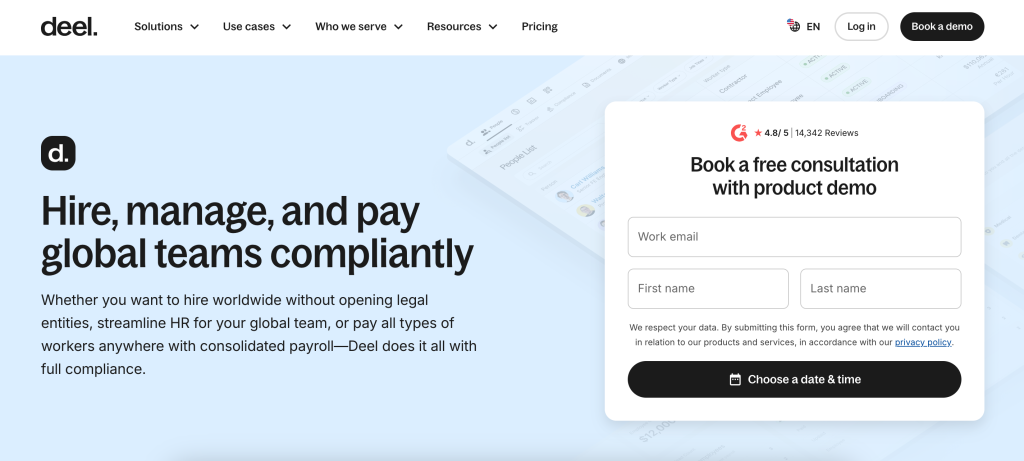
What The Official Pages Keep Pointing To :
- Hire, manage, and pay global teams compliantly
- Do more in less time with fewer tools and platforms
- Eliminate payroll delays and errors
- Avoid costly fines
Product Fit In 2026 :
The strongest reading from the official pages is that Deel is best evaluated through real workflow fit rather than generic feature shopping. Teams get more value when the product shape already matches the kind of work they need to do.
If you want to pressure-test that fit early, check Deel here and compare the official workflow language against your team’s current process.
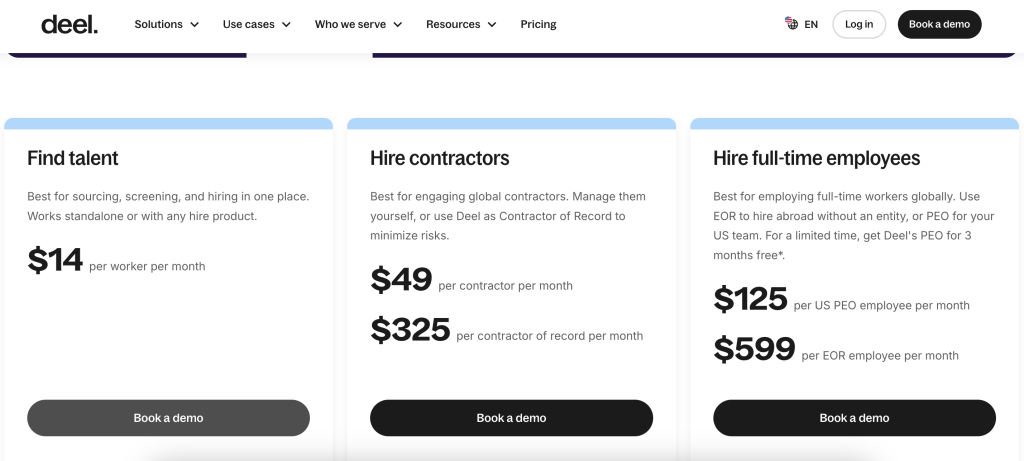
Pricing And Data Notes :
Official pricing references visible on the pages reviewed include $5, $20, $1, $16, $17, $22.
The important part is to use only the pricing, feature, and workflow details that are visible on the official pages instead of filling in gaps with assumptions.
What Buyers Should Watch :
Buyers should pay attention to product fit, daily operational friction, expansion paths, and whether the workflow shown on the official pages matches the work the team actually needs to run.
If you want to evaluate that directly, open Deel here and compare it against one real business workflow.
Practical Recommendation :
The safest recommendation is to adopt Deel when its strongest official use case matches the problem you need solved right now. If your use case is broader or different, an adjacent alternative may still make more sense.
Final Buying Note :
In 2026, the smartest way to evaluate Deel is still to use the official product pages, compare them against one real workflow, and decide whether the product reduces friction in a way your team will actually feel every week. That kind of grounded evaluation tends to beat generic feature shopping.
Verdict :
Deel in 2026 looks strongest when buyers evaluate it through official workflow fit instead of through generic software comparison habits.
If you want to pressure-test that fit, try Deel here and compare one real team workflow against the product’s official path.
FAQ :
Why Is Deel Worth Evaluating In 2026?
Because the official product pages make a clearer workflow case than a lot of tools in the same space, which helps buyers decide faster.
Should I Rely On Third-Party Pricing Summaries?
No. Use the official pages only and treat anything missing as something to verify before a purchase.
What Is The Best Way To Test Deel?
Use one real workflow, compare it against the official setup path, and judge whether the product removes friction.
Does Deel Look Better For Focused Or Broad Use Cases?
That depends on the product angle, but focused use cases are usually the clearest starting point.
When Should I Move Forward?
Move forward when the official workflow, visible pricing logic, and team fit all line up well enough to replace a messier current process.